How to Oil Paint Using the Glazing Technique (Complete Step-by-Step Guide)
- James Otto Allen
- Dec 3, 2017
- 4 min read
Updated: Nov 17, 2025

Learn the classical method for luminous, layered oil paintings - from underpainting to final glazes.
If you’ve ever wondered how Old Masters achieved that deep, glowing, stained-glass luminosity, you were probably looking at a painting built with glazes.
In this guide, I’ll walk you through exactly how glazing works, why it’s still a powerful technique for modern painters, and how you can start experimenting with it today - even as a beginner.
This method pairs really nicely with classical underpainting approaches such as grisaille, bistre, and raw umber underpaintings, and it’s one of the best ways to learn colour without being overwhelmed in my opinion.
If you want a deeper dive into underpainting itself, you can also download my free Raw Umber Underpainting Starter Pack at the end of this post.

What Is the Oil Painting Glazing Technique?
Glazing is the process of brushing a thin, transparent layer of darker paint over a completely dry layer of oil paint.
Each glaze subtly shifts the colour, temperature, and value of the layer below, allowing you to build:
luminous shadows
rich skin tones
glowing fabrics
atmospheric backgrounds
subtle transitions impossible to achieve alla prima
In classical academic painting, artists first constructed a detailed monochrome underpainting (a grisaille in greys, or a bistre in browns), then added colour through multiple glazes.
This is called the indirect method, and it’s the opposite of alla prima (“all at once”), where you work wet-into-wet in a single session.
Why Use the Oil Painting Glazing Technique?
Advantages of Glazing
Separates value from colour - you can nail proportions, shapes, and shadows before worrying about hue.
Builds luminosity - light passes through the transparent layers and reflects off the opaque underpainting (similar to stained glass).
Ensures accurate local colour - because each glaze modifies the underlying value without destroying it.
Ideal for portraits, fabrics, and subtle modelling.
Disadvantages of Glazing
Less spontaneous than alla prima
Takes more time (drying between layers)
Can reduce “happy accidents” and looseness
Requires patience and planning
If you like expressive brushwork and fast, energetic painting, alla prima might suit you better - but glazing is still worth learning if you want to understand classical colour layering. I almost always paint using a combination of the oil painting glazing technique glazing and more direct alla prima painting techniques.
Materials You’ll Need for Glazing
To glaze effectively, you’ll want:
Transparent pigments
(This technique works best with them.)
Scarlet Lake
Ultramarine Blue
Indian Yellow
Transparent Oxide Red
Raw Umber
A glazing medium
Options include:
Zest it glaze medium
A fully dry underpainting
Bistre, grisaille, or raw umber underpainting.
If you’re new to underpainting, grab my Raw Umber Underpainting Starter Pack at the bottom of this post.
How to Oil Paint Using the Oil Painting Glazing Technique (Step-by-Step)
Below is a demonstration based on my study of Pontormo’s portrait of Giovanni Della Casa, using a classical bistre underpainting followed by transparent colour glazes.
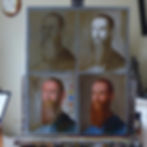
Step 1 - (top left) Prepare the Ground and Draw the Portrait
On a linen support, I first tone the grey ground (titanium white + ivory black) with a wash of raw sienna.
Then, using charcoal, I map out the portrait.
Once the drawing is correct, I trace over it with raw umber thinned with medium to lock the drawing in place.
Step 2 - (top right) Establish the Bistre Underpainting
Next, I apply opaque white to create something that looks like an overexposed, ghostly photograph.
This is because each glaze will darken the painting, so starting slightly lighter preserves the future value range.
At this stage, the painting becomes a bistre (a brown monochrome underpainting).
Step 3 - (bottom left) Apply Your First Transparent Glazes
Using my transparent palette - scarlet lake, ultramarine, raw umber, Indian yellow, transparent oxide red - I create thin, even glazes mixed with medium.
To lighten areas, I simply rub back or remove part of the glaze.
This is where the paint begins to glow.
Step 4 - (bottom right) Build Depth With Additional Glazes and Scumbles
After each glaze layer is fully dry, I apply another.
This slow layering:
refines the form
builds volume
deepens the shadows
enriches the colour
In some areas, I add scumbles - thin, opaque or semi-opaque layers - to give certain passages more body.
Tips for Successful Glazing
Let layers dry completely (touch-dry is not enough for heavy glazing).
Use extremely small amounts of medium - avoid slippery, oily surfaces.
Keep glazes thin - they should look like stained glass, not frosting.
Work from broad to specific - glazes unify large shapes, not tiny details.
Mind your values - glazing darkens; scumbling lightens.
Use the right pigments - transparent pigments glaze better than opaque ones.
Common Mistakes to Avoid
Using too much medium
Glazing over wet paint
Using opaque pigments and expecting transparency
Over-glazing a shadow until it becomes muddy
Not starting light enough in the underpainting
Is Glazing a Good Technique for Beginners?
Yes - especially if you’ve struggled to juggle drawing, value, and colour simultaneously.
A monochrome underpainting lets you:
solve proportions and value first
then learn colour slowly and safely
If you want a structured introduction to this approach, start with a raw umber underpainting (simplest version of a bistre).
Download my Raw Umber Underpainting Starter Pack (Free) It includes 3 exercises that flow directly into glazing work.
Related Posts You Might Find Useful
Enjoyed This Post? Share It!
If you found this guide helpful, please share it below with fellow artists or save it for later:
Share on Facebook
Share on X
Share on LinkedIn
Copy a shareable link
Print this post
Save images directly to your collection
Sharing helps others discover these techniques and supports my free guides and tutorials - thank you!
Download the Free Raw Umber Underpainting Starter Pack
Learn the foundation that makes glazing so much easier - values, shapes, and shadow structure.
✔ 3 beginner-friendly underpainting exercises
✔ Sight-size, comparative measure & construction
✔ Perfect preparation for glazing or full colour painting