Underpainting With Raw Umber: The Perfect Bridge From Charcoal to Oil Painting
- James Otto Allen
- Nov 14, 2025
- 5 min read
Updated: Nov 17, 2025
When you’re first learning to paint, nothing feels more overwhelming than jumping straight into full colour. That’s why I love underpainting with new students: it lets you focus on value, structure, and light before you ever deal with chroma or saturation.
But even within underpainting, there are different methods - some simple, some more complex.
In this post, we’ll cover the simplest, most beginner-friendly underpainting technique: the Raw Umber Wash, sometimes called an umber block-in or wipe-out underpainting.
This method uses only one colour (raw umber) and no white at all. It’s a natural stepping-stone from charcoal drawing, which is exactly why I’m including as part of the introductory lessons in my Oil Painting Foundations course.
What Is a Raw Umber Wash Underpainting?
A raw-umber wash underpainting is a thin first layer of paint where:
The lights are created by wiping thin paint away or leaving the light canvas colour uncovered with paint
The shadows are created by adding more raw umber
No white is used - your lightest value is simply the canvas or imprimatura showing through
This means the full value range comes from thin vs. thick, not light vs. dark pigment mixtures.
It’s one of the easiest and most intuitive painting methods because it behaves very similarly to charcoal:
You darken by adding more, and you lighten by removing.
Materials You Need
Raw Umber (raw has a greenish, more neutral undertone and dries faster)
Medium (I usually use sansodor but for beginner students I sometimes recommend liquin - see my post on oil painting materials for more info)
A soft cloth/paper towel for wiping back lights
A couple of brushes (a medium flat and a soft round is plenty)
Canvas or panel either white or with a light imprimatura
Why Raw Umber?
Raw umber is perfect for this technique:
It’s naturally muted and neutral
It dries quickly, letting you paint over it within a day or two
It has a wide tonal value range despite being a single pigment
It thins beautifully without becoming gummy
This makes it ideal for beginners who are still getting used to how oil paint behaves. For me it's the charcoal equivalent in oil paint.
How the Method Works (Step by Step)
1. Making the 'Box'
Just like charcoal:
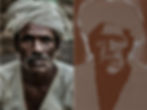
Over a white canvas washed with some raw umber already - an imprimatura - I mark the left, right and bottom extremity of the main point of interest, in this case his face. The top of his turban goes off the canvas so I don't mark that
I eyeball the distances from my reference and then I check either with a ruler, but the important thing is to eyeball first. The goal is to be confident enough to never need to check because your eye is trained enough at estimating accurately distances and angles.
Think of this stage as swapping your charcoal with raw umber on a brush.

Photo by SwapnIl Dwivedi on Unsplash
2. Block In Large Shapes
Just like charcoal:
I then simplify and draw the biggest shapes I can see, keeping the lines straight
Again, remember to eyeball an angle / distance of a line first, draw it, and then check it. It's very important to get these shapes correct at this stage, or the rest of the painting will not be in proportion and it will be very difficult to undo at a later stage
Go slowly and carefully

3. Smaller Shapes
Once the large shapes have been placed accurately:
I then turn to the smaller shapes while still only using straight lines
These shapes are also very important to get accurate, as with the large shapes
Try to think about light / shade creating lines and planes of the face

4. Block in Tonal Values of Large Shapes
Using a larger brush with some raw umber and sansodor / liquin:
Apply raw umber to the background, turban and top (in this case) - large areas
The difference now with charcoal is that the less sansodor / liquin you mix with the raw umber paint, the darker the tonal value will be. With charcoal it was about how hard you pressed, now it's about how thin the paint is on the canvas to control values.
If the large blocks of values bleed over lines that's fine, you can always move paint around while it's still wet - like charcoal! It's surprisingly forgiving.

5. Reinforce Accents
The face:
Now I block in the shadowed parts of the face. I like to make these areas big and simple first - I ignore small changes in values like on his temple on the left there is a little light hitting it - and later wipe off some paint to lighten
Remember - the less the more unthinned raw umber you have on the brush, the darker the value will be on the canvas
6. Refine Until Finish
I keep refining the shapes, wiping some oil off here and there, re-assessing shapes from the reference, measuring, until I'm happy with the result.
This underpainting took around 2-3 hours and for me it is enough to paint colour on top of. Of course you can push your underpainting as far as you like, doing multiple layers of raw umber, it depends on your preference.

Why This Is Such a Good Beginner Exercise
✔ It mirrors charcoal drawing
Students familiar with charcoal will immediately understand the logic: shadows = add; lights = remove.
✔ It introduces the idea of mediums
Learning how to thin paint is a crucial first step before tackling full painting.
✔ It teaches value control without the complication of mixing
Students don’t yet need to handle palette-knife mixing or white paint.
✔ It builds confidence before moving to more advanced underpainting
Once this feels natural, they can move on to the next level…
What Comes Next: Underpainting With Raw Umber + White
This post is about the simplest method - a one-colour wash with no white.
The next logical step (and another blog post) will dive into:
Mixing values of raw umber + white
Learning to use a palette knife
Creating a true value scale
Bridging the gap into more classical grisaille (a grey painting)
That second method introduces is a bit more tricky if you're not used to using oily paint so underpainting with wash is a great introduction I think.
Conclusion
Underpainting with a raw umber wash is one of the most powerful and accessible ways to begin oil painting. It acts as a bridge from drawing to painting, teaching students value, shape, and paint handling without overwhelming them.
This is exactly why it forms the backbone of the early modules in both my upcoming Drawing Foundations course and my Oil Painting course.
Recommended Posts
You might also enjoy:
Want More Lessons Like This?
Join my newsletter for weekly tutorials, behind-the-scenes content, and early access to my upcoming Drawing Foundations course.
Enjoyed this post?
If this was helpful, please click the Like button on this article - it helps more artists discover it.
Share the Post
Know someone who would benefit from this? Use the share buttons below to pass it on via X, linkedin, Facebook or just copy the link. Every share helps these articles reach more artists.
PS: If you’d like me to cover a topic in a future post, leave a comment - I read them all!