How to Paint a Portrait With Dramatic Lighting (From Underpainting to Final Pass)
- James Otto Allen

- Nov 16, 2025
- 3 min read
Updated: Nov 17, 2025

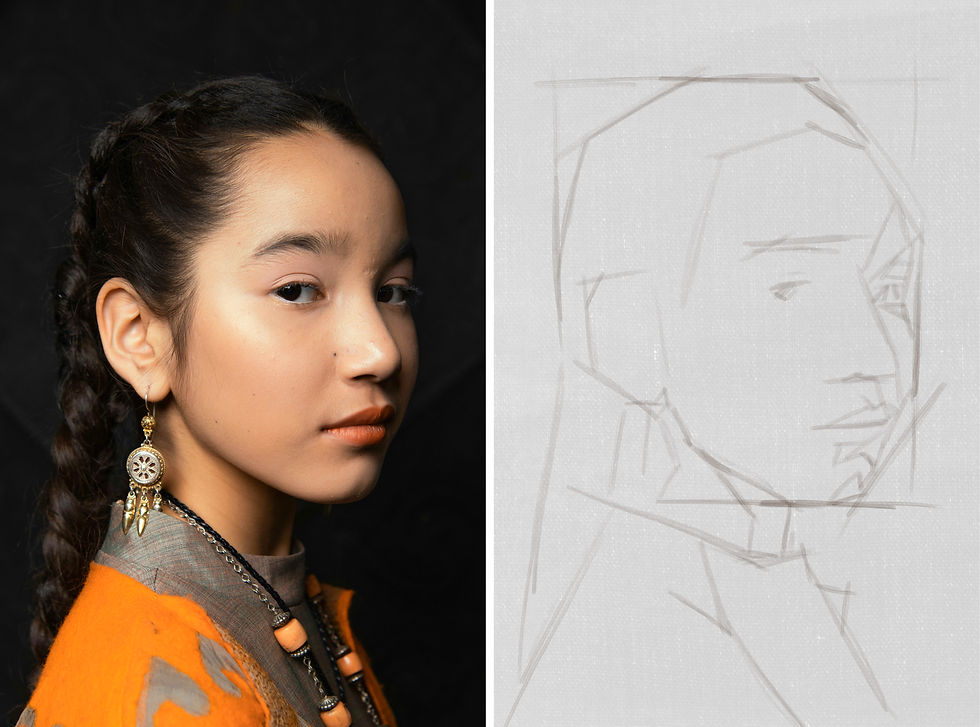
In this post, I’m going to walk you step-by-step through my entire painting process: drawing the underpainting using broad straight lines, establishing major shadow shapes, organising value, controlling edges, and then refining the portrait with highlights.
For this demonstration, I painted it digitally (Procreate) so you can clearly see each stage - but the workflow applies perfectly to oil painting too.
Want to start your own underpainting today? Grab my free Raw Umber Underpainting Starter Guide - a simple, step-by-step checklist to go from underpainting to refined layers with confidence.
Download the Starter Guide below.
1. Choosing the Reference & Lighting
Why dramatic lighting makes portrait painting easier
Strong, directional lighting - especially above and to the side - gives you:
clear shadow shapes
simple value organisation
bold three-dimensional form
This setup naturally teaches you to think in planes and light logic. This theatrical lighting makes it the easiest to make your subject or object look 3D on your canvas.

2. The Raw Umber Underpainting
Laying the foundation for everything that follows
I always start with 'boxing up' what I'm looking at as shown. In this phase I'm
Only focusing on large shapes first and then onto smaller facial features
Keeping my lines large and straight, no curves
organising light vs shadow
keeping everything simple
Once I'm happy with the drawing, I start to block in the values of the raw umber wash. See 'underpainting with raw umber' for a more detailed explanation.


Struggling to know exactly where to begin with your underpainting? My free Starter Guide walks you through the entire process, including tools, value exercises, and common mistakes to avoid.
Download the Starter Guide below.
3. Blocking In the Major Forms
Modelling the portrait using base colours
Once the underpainting is dry, I then start to apply large masses of colour to background, clothes, hair and basic planes of the face. Think:
forehead plane
cheek planes
nose block
chin structure
neck cylinder
You’re essentially sculpting the head with mid-tones and subtle variety in colour (and no highlights yet I know it's tempting but try and avoid putting in those all impressive highlights at the beginning)


4. Building Light
Layering...
Once I'm happy with blocks of midtones almost like a mosaic, I let the painting dry and on the next sitting I:
Add slightly lighter values on certain parts of the face to create depth
Still don't do highlights!!
Refine smaller shapes
I'm now starting to pay more attention to edges like the edge from hairline to forehead.

5. Highlights (finally :D ) and Finishing
Now to finish off on the last sitting
I can now add the smaller details like in this case jeweller, eye lashes, refine everything further until completion. This is where you can decide how much detail you put into your chosen areas. If you like photorealism you can keep looking at pushing your painting until the shapes get smaller and smaller and eventually look like all of the shapes in the photograph. If you prefer a more painterly look, think about where you want your audience to look. High detail draws attention - remember this.

What This Exercise Teaches You
Painting a head with strong lighting forces you to learn:
value control
clean shadow shapes
simplified colour
plane structure
lighting logic
how to refine without overworking
Related Blog Posts
Enjoyed This Post? Share It!
If this walkthrough helped, you can support my work by sharing it:
Pin on Pinterest
Share on Facebook
Send to a friend learning portrait painting
It helps the blog grow and lets me create more free tutorials.
Final Thoughts
Dramatic lighting teaches you almost everything you need to know about portrait painting in one go. It simplifies the values, forces you into clean shapes, and gives you a striking, cinematic result even with minimal detail.
Ready to take your portrait painting to the next level? Download my free Raw Umber Underpainting Starter Guide and start practicing the exact workflow I use in this demo. Perfect for beginners and those looking to refine their painting process.
Claim Your Free Guide


Comments